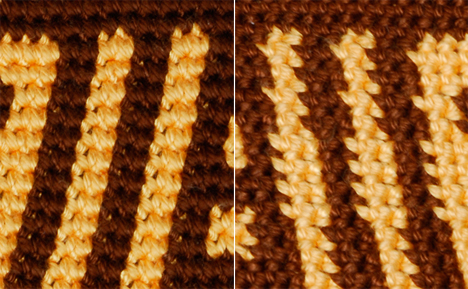
I’ve switched colors back and forth this way for years, but just recently noticed that the back of the work does not always look the same. To see what I’m talking about, please take a close look below at the back of the fabric (on the right). Do you see the jagged edges?

1. Front of the fabric (on the left) and back of the same section (on the right), showing the “twist” that occurs when switching colors.
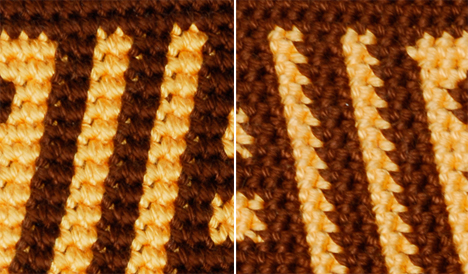
Now look at the right half of photo 2 below. Notice the consistently smooth edges of the stripes on the back. The fronts of each sample (shown on the left in the photos above and below) look very similar, but the backs are quite different.

2. Front of the fabric (on the left) and back of the same section (on the right), showing the “twist” that occurs when switching colors.
Why do the backs look so different? Let’s see if you can figure it out. I’ll give you a hint. The jagged stripes in photo 1 document how many rounds I crocheted at one time. From bottom to top (the way it was worked), I crocheted 3 rounds, put down the work, then picked it up and crocheted 4 more rounds, then kept putting it down every time I finished a round. So, what was I doing differently each time?
It took me a while to figure it out, but I finally realized that the position of the balls were reversed each time I began crocheting again. When the brown ball was on one side of the yellow, the back of the work looked one way, but when it was on the other side, the twist that formed in the back looked very different. Eureka!
After figuring out which position produced the best results, I made sure the yellow and brown balls were always in the same place while crocheting the sample in photo 2. Much better! It’s amazing that this slight variation in technique makes such a difference – don’t you think?
Your method sounds very interesting. Do you have any detail photos of the front and back of your pieces that you could post in the Ravelry Tapestry Crochet https://www.ravelry.com/groups/tapestrycrochet group so that we could see the result?
Interesting. I recently began doing tapestry crochet & it’s pretty elementary (a Halloween trick-or-treatiing bag) but I just looked at my “Boo” and there’s not much diff between the front & the reverse.
On the other hand, not knowing how “it was done”, I had been doing it my own, weird, way.
For one, though it meant my yarns always ended up wrapping themselves in the same direction, I kept the working yarn ALWAYS getting worked from the front of the piece. Meaning that when bringing it forward I pulled it towards the front of the piece and in front of the last stitch.
The other thing is that I didn’t do the usual way of switching colors (finishing the sc w/ the new color) but finishing the stitch, THEN pulling the new color, cinching the “old” loop TIGHT & continuing in the new color but pulling it from the same gap as the “old” stitch. Meaning that there isn’t an extra stitch made but a single one w/ the new yarn covering the previous color for that stitch.
The result seems to have a slight disadvantage in that it adds volume to the piece so that a boxy bag, for instance, has some bulging but it’s not unattractive. At least to me.
I’ve made these bags in cheap yarn, worsted weight, w/ the G hook on their bottoms for sturdiness & an H hook for a bag w/ some “give” to it.
Does this help anyone? Or is there something I shouldn’t be doing that will make me suffer (not literally just thinking it might be like a bad habit that comes back to bite you) in my journey into tapestry crocheting?
I shared my pictures to the Ravelry group. The project is Toddler Boo-bag.
[…] just make sure the twist is right up against the back of the work. You can see in the example in her post about this that it does not produce any bump or peek of color, at least when done […]